
Introduction
Hat embroidery has become a popular way to add a personal touch to headwear, whether for fashion, branding, or gifting. Custom embroidery on hats allows individuals and businesses to create unique designs that stand out, making embroidered hats a favorite choice for sports teams, corporate promotions, and streetwear brands. With advancements in embroidery machines and digitizing techniques, creating high-quality embroidered hats is now more accessible than ever.
However, embroidering hats presents unique challenges compared to flat fabrics. Unlike t-shirts or tote bags, hats have a curved shape and often feature seams, stiff brims, or ventilation eyelets that can interfere with smooth stitching. This structure makes it difficult to hoop the hat correctly, align the design accurately, and maintain fabric stability throughout the embroidery process. Additionally, different hat materials—such as cotton, denim, wool, or synthetic blends—react differently to embroidery, requiring adjustments in thread tension, stabilizer type, and needle selection.
To achieve professional and long-lasting results, it is essential to use the right techniques. Proper hooping, correct stitch density, and choosing the appropriate stabilizers and threads, all play a crucial role in ensuring high-quality embroidery. By mastering these techniques and avoiding common mistakes, both beginners and experienced embroiderers can create flawless designs that maintain their shape and durability. This guide will provide essential tips and best practices to help you achieve the best embroidery results on hats.
1. Selecting the Best Embroidery Materials
Choosing the right embroidery materials is essential to achieve high-quality results when embroidering hats. Unlike flat fabrics, hats have a curved structure and often feature stiff brims or thick seams, that make material selection even more important. The right combination of thread, stabilizer, and needle ensures durability, clarity, and professional-looking embroidery.
Choosing the Right Embroidery Thread: Polyester vs. Rayon
The type of thread you use significantly impacts the final look and longevity of the embroidery. The two most commonly used embroidery threads are polyester and rayon, each with its own advantages:
- Polyester Thread: This is the best choice for hat embroidery because of its strength, durability, and resistance to fading. Polyester threads can withstand washing, UV exposure, and sweat, making them ideal for hats used outdoors or for active wear.
- Rayon Thread: Rayon offers a smoother and shinier finish, which gives embroidery a premium look. However, it is less durable than polyester and more prone to breakage, especially when stitching through thick hat materials. It is best suited for decorative embroidery on hats that won’t experience heavy wear.
For most hat embroidery projects, polyester thread is the preferred option due to its resilience and ability to maintain vibrant colors over time.
Stabilizers are essential for keeping fabric in place during embroidery, preventing shifting, puckering, or distortion. Since hats are more structured than other garments, selecting the right stabilizer is crucial:
- Tear-Away Stabilizer: Ideal for structured caps, trucker hats, and stiff-brimmed hats. It provides temporary support during stitching and can be easily removed afterward without leaving any visible residue.
- Cut-Away Stabilizer: Best for soft, unstructured hats like beanies or floppy bucket hats. It offers long-term stability and prevents stretching or warping after multiple washes.
- Adhesive Stabilizer (Sticky Back): Useful for securing hats in place without the need for hooping, which is particularly helpful for curved surfaces. It works well for delicate hat fabrics that might get damaged by clamps or tight hooping.
Selecting the correct stabilizer ensures that the embroidery design stays intact, maintains its shape, and looks professionally done.
Proper Needles for Hat Embroidery
The type and size of the embroidery needle directly impact stitch quality and fabric penetration. Using the wrong needle can lead to thread breaks, missed stitches, or even fabric damage. Here’s what to consider when choosing the right needle for hat embroidery:
- Size 75/11 or 80/12 Embroidery Needles: These are the most commonly used sizes for hat embroidery. They provide a balance between strength and precision, allowing smooth stitching without causing unnecessary holes in the fabric.
- Ballpoint Needles: Ideal for embroidering knit hats or stretchy materials like beanies, as they gently separate the fabric fibers instead of piercing them.
- Sharp Point Needles: Recommended for thick or woven hat fabrics like denim or canvas, as they can easily penetrate without fraying the fabric.
Using the correct needle ensures clean stitches, reduces thread breakage, and enhances the overall quality of the embroidery design.
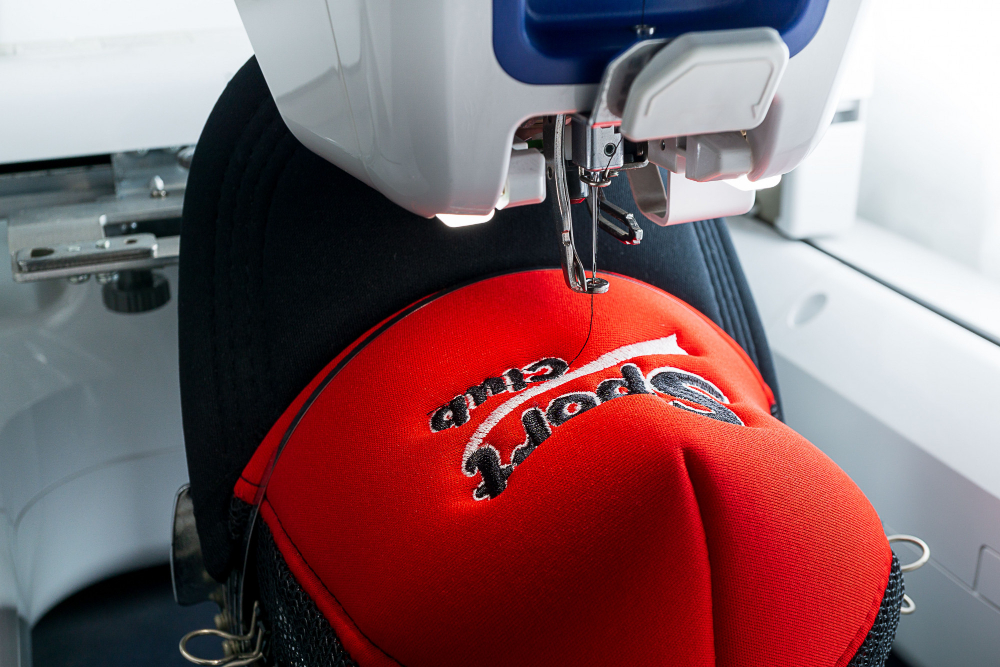
2. Proper Hooping and Positioning
Hooping and positioning are crucial steps in hat embroidery. Unlike flat fabrics, hats have a curved structure, seams, and sometimes stiff materials that can make embroidery tricky. If a hat isn’t hooped correctly, the design might end up crooked, distorted, or puckered. Proper hooping ensures the hat stays secure during stitching, allowing for a clean, professional finish.
Why Proper Hooping Matters
When a hat is hooped properly, the fabric stays in place, preventing any unwanted movement during embroidery. If the hat shifts, even slightly, the design can become misaligned or stretched, ruining the final look. Tight but even tension is key—too loose, and the fabric will shift; too tight, and the design may become warped.
Here are a few tips to ensure stability:
- Always smooth out any wrinkles or folds before hooping.
- Make sure the hat is firmly secured, but don’t over-tighten.
- Double-check that the hat sits evenly in the hoop to prevent distortion.
Getting this step right saves time and effort while delivering high-quality results.
Cap Frame vs. Standard Embroidery Hoop
The type of hoop you use makes a big difference in the embroidery process.
- Cap Frame (Hat Hoop): This is designed specifically for embroidering hats and provides the best results. It holds the hat securely in place, making it easier to stitch on curved surfaces. Cap frames work best for structured hats like snapbacks and trucker caps.
- Standard Embroidery Hoop: While not ideal for hats, a regular hoop can work for softer, unstructured hats like beanies. If you go this route, using an adhesive stabilizer can help keep the hat from slipping.
For most structured hats, a cap frame is the better choice since it provides better tension and keeps the design from shifting during embroidery.
Marking the Center for Proper Alignment
One of the most common embroidery mistakes is misaligned designs. A slightly off-center logo or text can make an otherwise great hat look unprofessional. To avoid this, follow these steps:
- Find the Center: Fold the front panel of the hat slightly to locate the middle.
- Mark the Placement: Use a chalk pencil or a water-soluble marker to draw a small guideline at the center. Some embroiderers also mark horizontal and vertical reference lines to align the design properly.
- Use Your Machine’s Tools: If your embroidery machine has a laser alignment or trace function, use it to confirm the placement before stitching.
Taking a few extra minutes to mark the embroidery area correctly can make a huge difference in the final result.
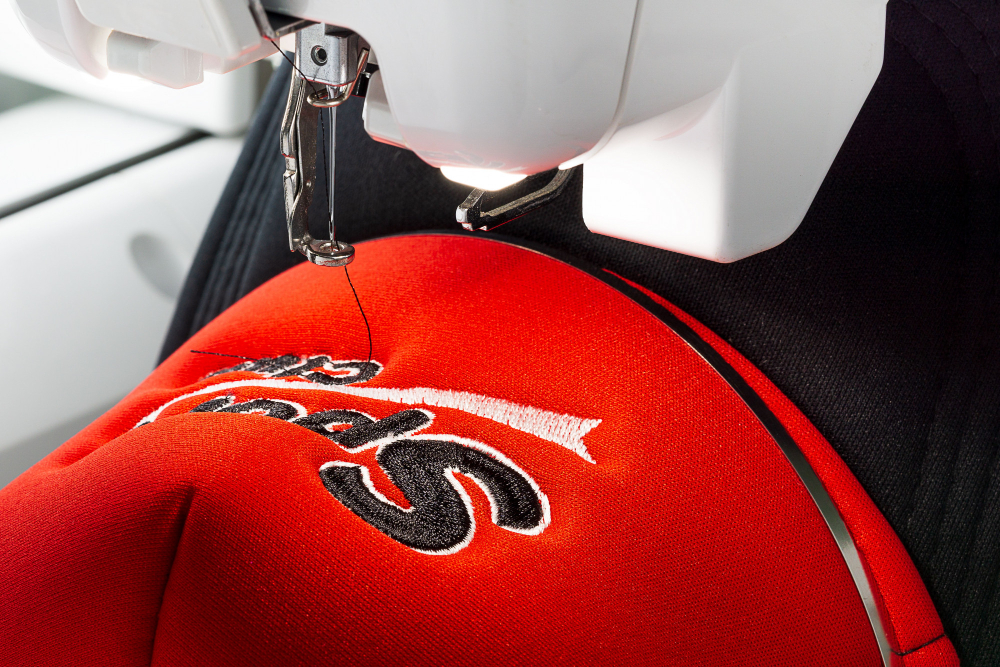
3. Essential Machine Settings for Hat Embroidery
Getting the right machine settings is crucial for high-quality hat embroidery. Since hats are curved and made from different fabrics, they require special adjustments to ensure smooth and professional stitching. If the settings are incorrect, you might face problems like thread breaks, uneven stitches, or designs that don’t look right.
Here’s how to adjust your machine settings for the best results.
Stitch Density and Tension Settings
- Stitch Density: This refers to how close the stitches are placed together in the design. If the stitches are too close, the fabric may pucker or become stiff. If they’re too far apart, the design may look thin or incomplete. A balanced stitch density ensures a smooth and well-defined design.
- Tension Settings: The tension controls how tightly the thread is pulled while stitching. If the tension is too high, the thread can snap. If it’s too loose, the stitches may look messy. A medium tension setting usually works best for hat embroidery. You may need to adjust slightly depending on the type of hat fabric and thread you’re using.
Adjusting Speed to Prevent Thread Breaks
Embroidery machines can stitch at different speeds, but for hats, it’s best to slow things down.
- Why? Hats have a curved surface, and stitching too fast can cause the needle to hit the fabric at the wrong angle, leading to thread breaks.
- Recommended Speed: A speed of 600 to 800 stitches per minute (SPM) is ideal. Slowing down the machine helps keep the stitches even and reduces mistakes.
If you notice frequent thread breaks, lowering the speed can make a big difference.
Choosing the Right Underlay Stitches
Underlay stitches are the first layer of stitching that helps hold the fabric in place before the final design is embroidered. These stitches prevent the fabric from shifting and create a solid base for clean embroidery.
The best underlay stitch depends on the type of design:
- For thick fabrics (like structured caps): A zigzag underlay works well because it flattens the fabric and supports dense stitching.
- For thinner fabrics (like unstructured hats): A light tatami underlay helps keep the embroidery stable without adding too much bulk.
Using the right underlay stitches ensures that your final design looks smooth and professional.
4. Common Mistakes and How to Avoid Them
Even experienced embroiderers run into problems when working with hats. Because hats are curved and made from different fabrics, embroidery can sometimes go wrong. Here are some common mistakes and how to fix them.
Puckering and Distortion – Causes and Solutions
What is it?
Puckering happens when the fabric wrinkles or gathers around the stitches, making the design look uneven or stretched.
Causes:
- Using the wrong stabilizer.
- Stitch density is too high.
- The hat wasn’t hooped properly.
How to Fix It:
- Use a firm stabilizer like tear-away or adhesive backing to keep the fabric from moving.
- Reduce the stitch density so the design isn’t too tight.
- Make sure the hat is hooped correctly to keep it stable during embroidery.
Thread Breaks and Tension Issues – How to Fix Them
What is it?
Thread breaks when the needle keeps snapping the thread, or the stitches look loose or uneven.
Causes:
- Tension is too tight or too loose.
- The embroidery speed is too high.
- Using the wrong needle or thread type.
How to Fix It:
- Check your tension settings. If the thread keeps breaking, loosen the tension slightly. If the stitches look loose, tighten it a bit.
- Lower the embroidery speed (600–800 stitches per minute is ideal).
- Use the right needle. A 75/11 or 80/12 sharp-point needle works well for most hats.
- Choose a strong thread, like polyester, which is less likely to break.
Design Misalignment – Proper Marking and Centering Techniques
What is it?
If your design is not centered or looks crooked on the hat, it means there was an alignment problem.
- Not marking the center of the embroidery area.
- The hat moved while stitching.
- Incorrect hooping.
How to Fix It:
- Mark the center of the embroidery area with a fabric pen or chalk before you start.
- Use a cap frame instead of a standard hoop to keep the hat secure.
- Double-check your design placement before starting the machine to ensure it’s straight.
5. Finishing Touches for a Professional Look
Once the embroidery is done, the job isn’t over yet! The final steps make a big difference in how the hat looks and feels. These finishing touches help ensure your embroidery looks clean, polished, and professional.
Removing Excess Stabilizer Without Damaging Stitches
Stabilizers help keep the fabric steady while stitching, but after embroidery, you need to remove them carefully.
- Tear-Away Stabilizer: Gently pull it away from the back of the design. Be careful not to tug too hard, or you might stretch the stitches.
- Cut-Away Stabilizer: Use sharp scissors to trim as close to the design as possible without cutting the threads.
- Adhesive Stabilizer: Peel it off slowly, making sure not to pull the fabric.
If any tiny stabilizer pieces remain, you can remove them with tweezers or a damp cloth.
Using Heat or Steam to Remove Hoop Marks
Hoop marks can leave an unwanted imprint on the hat. Luckily, you can remove them easily with heat or steam.
- Use a steam iron (without pressing too hard) to gently lift the fibers back into place.
- A garment steamer works great for softening hoop marks. Hold it a few inches away and let the steam do the work.
- For tough marks, lightly rub the area with a soft brush or your fingers to smooth it out.
Quality Control – Checking for Missed Stitches or Loose Threads
Before you call it done, check the embroidery to make sure it’s perfect.
- Look for gaps in the design where stitches might be missing. If you see any, you may need to redo that section.
- Trim loose threads with small scissors to keep the design clean and professional.
- Check the back of the embroidery to ensure the stabilizer is properly removed and there are no knots or tangles.
6. Pro Tips for Better Hat Embroidery
Embroidery on hats can be tricky, but with the right techniques, you can make sure your designs turn out great every time. Here are some expert tips to help you get the best results.
1. Run a Test Stitch Before Embroidering the Actual Hat
Before you start stitching on the real hat, always do a test stitch on a scrap piece of fabric or an old hat. This helps you:
- Check if the design looks good and is properly aligned.
- Make sure the thread, needle, and stabilizer work well together.
- Adjust the tension or density if needed.
A test run saves time, prevents mistakes, and helps you avoid ruining a brand-new hat.
2. Avoid Thick or Overly Dense Designs
Hats are different from flat fabrics because of their curved shape and firm structure. If your design is too thick or has too many stitches packed together, it may not sew properly. This can cause:
- Uneven stitching
- Puckering (wrinkled fabric)
- The thread breaking during embroidery
To avoid this, choose simple, clean designs with moderate stitch density. Keep details minimal and use bold, well-spaced fonts for text.
3. Handling Tricky Hat Areas Like Seams and Eyelets
Hats have seams, eyelets (small holes for ventilation), and curved surfaces that can make embroidery challenging. Here’s how to work around them:
- Avoid placing designs over thick seams, as the stitches may not come out even. If you must embroider over a seam, slow down the machine and use a strong needle.
- Stay clear of eyelets when possible, as they can interfere with stitching and cause gaps in the design.
- Use a cap frame on your embroidery machine, as it helps hold the hat in place and prevents shifting.
Conclusion
Embroidering hats may seem challenging at first, but with the right techniques and a little practice, you can create high-quality designs that look professional.
To recap, here are the key tips for successful hat embroidery:
- Use the right materials, including proper thread, stabilizers, and needles.
- Hoop and position the hat correctly to keep the design aligned.
- Adjust machine settings like stitch density and speed to prevent errors.
- Avoid common mistakes such as puckering, thread breaks, and misalignment.
- Add finishing touches like trimming excess stabilizer and using steam to remove hoop marks.
- Test your design on scrap fabric before working on the actual hat.
The best way to improve is by practicing and experimenting with different materials and settings. Don’t be afraid to try new designs and adjust your techniques along the way.
If you want to take your hat embroidery to the next level, consider exploring additional resources, such as embroidery tutorials or machine manuals. And if you’re looking for custom designs but don’t have the time or equipment, professional embroidery services can help bring your ideas to life.
With patience and the right approach, you’ll be creating beautifully embroidered hats in no time!